[AI SCHOOL 5기] 텍스트 분석 실습 - 워드클라우드
Okt Library #
- 한국어 형태소 분석기 KoNLPy 패키지에 속한 라이브러리
KoNLPy 테스트 #
python
from konlpy.tag import Okt

tokenizer = Okt()
tokens = tokenizer.pos("아버지 가방에 들어가신다.", norm=True, stem=True)
print(tokens)norm: 정규화(Normalization), ‘안녕하세욯’ -> ‘안녕하세요’stem: 어근화(Stemming, Lemmatization), (‘한국어’, ‘Noun’)
Pickle Library (Extra) #
- 파이썬 변수를 pickle 파일로 저장/불러오기
python
with open('raw_pos_tagged.pkl', 'wb') as f:
    pickle.dump(raw_pos_tagged, f)

with open('raw_pos_tagged.pkl','rb') as f:
    data = pickle.load(f)
크롤링 데이터 전처리 #
크롤링 데이터 불러오기 #
python
df = pd.read_excel('result_220328_1314.xlsx')
articles = df['Article'].tolist()
articles = ''.join(articles)- Article 데이터를 불러와서 리스트화 시키고 다시 하나의 문자열로 변환
형태소 단위 분해 #
python
from konlpy.tag import Okt

tokenizer = Okt()
raw_pos_tagged = tokenizer.pos(articles, norm=True, stem=True)
단어 등장 빈도 시각화 #
python
word_cleaned = ['불용어가 제거된 단어 목록']

# NLTK의 Text() 클래스에서 matplotlib의 plot 기능 제공
word_counted = nltk.Text(word_cleaned)
plt.figure(figsize=(15, 7))
word_counted.plot(50)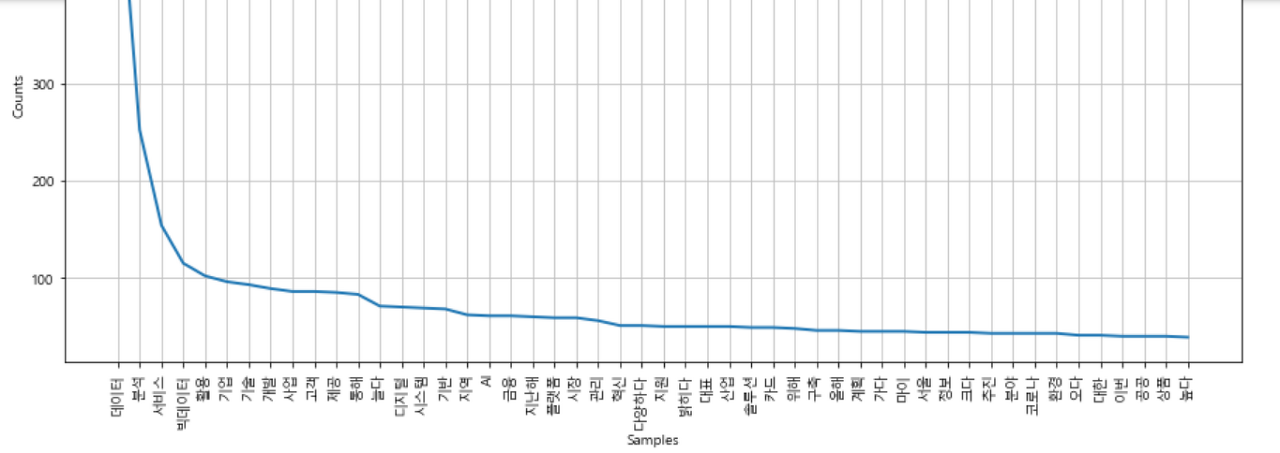
단어 등장 빈도 시각화 (막대그래프) #
python
# NLTK의 FreqDist() 클래스를 선언하면 인덱스 열이 지정된 객체 생성
word_frequency = nltk.FreqDist(word_cleaned)

df = pd.DataFrame(list(word_frequency.values()), word_frequency.keys())
result = df.sort_values([0], ascending=False)
result.plot(kind='bar', legend=False, figsize=(15,5))
plt.show()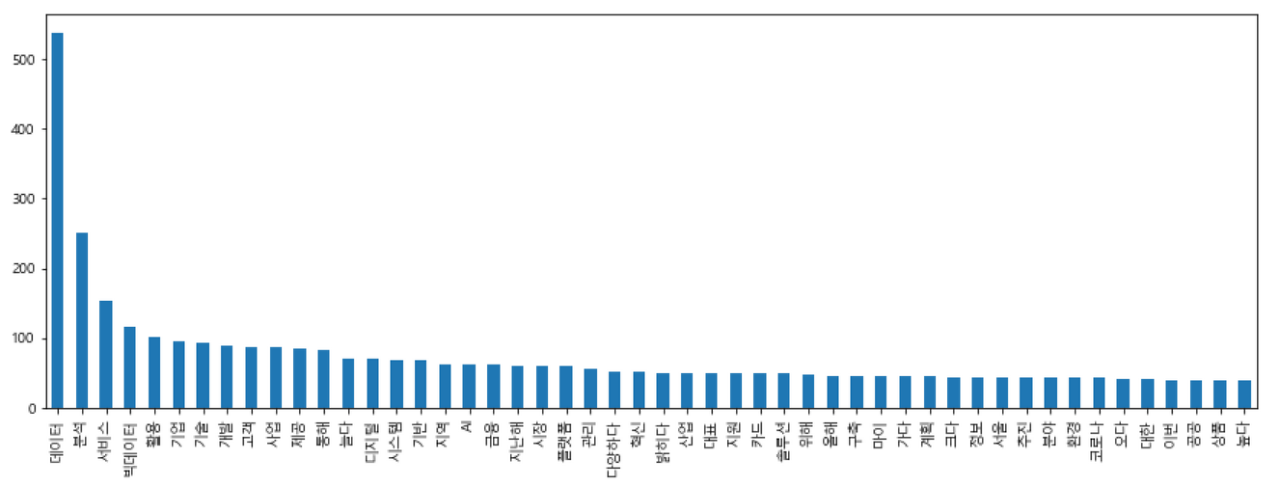
Word Cloud #
Import Libraries #
python
from wordcloud import WordCloud
import matplotlib.pyplot as plt
from PIL import Image
import numpy as np
import matplotlib.pyplot as plt
Create WordCloud #
python
word_cloud = WordCloud(font_path="malgun.ttf",
                       width=2000, height=1000,
background_color='white').generate_from_frequencies(word_dic)width,height: 워드클라우드 해상도background_color: 배경색max_words: 단어 최대 갯수 (default: 200)max_font_size: 최대 글자 크기prefer_horizontal: 가로로 보여주는 정도, 가로로만 그리려면 1.0 설정
Show WordCloud #
python
plt.figure(figsize=(15,15)) # 화면에 보여지는 크기
plt.imshow(word_cloud)
plt.axis("off")
plt.tight_layout(pad=0)
plt.show()
Masking #
python
python_coloring = np.array(Image.open("python_mask.jpg"))

word_cloud = WordCloud(font_path="malgun.ttf",
                       width=2000, height=1000,
                       mask=python_coloring,
background_color='white').generate_from_frequencies(word_dic)np.array로 이미지 파일을 열면 픽셀 단위의 행렬 생성mask파라미터에 Numpy Array 전달- WordCloud의 해상도는 원본 이미지의 해상도에 영향을 받음
Coloring #
python
from wordcloud import ImageColorGenerator

image_colors = ImageColorGenerator(python_coloring)

...

plt.imshow(word_cloud.recolor(color_func=image_colors), interpolation='bilinear')ImageColorGenerator객체를 통해 이미지로부터 색상을 추출recolor함수를 통해 이미지 컬러 다시 칠하기interpolation: 비어있는 픽셀 값을 칠하는 방법,bilinear(보간법)colormap: 임의로 색상 지정 ('Reds','Blues'등)

Save to Image File #
python
word_cloud.to_file("word_cloud_completed.png")